 GTelemetry / Help
GTelemetry records the telemetry from your sim racing and real-world track sessions, then helps you understand where you're losing time and what to change. You record on a phone or computer next to your PS5, and review on any computer in your browser at app.trackandsim.com.
| Source | How you record it | What you get |
|---|---|---|
| Gran Turismo 7 (PS5) | The GTelemetry Recorder Android app, or the gtelemetry command-line recorder on a Mac | Every page and all 13 analysis cards |
| Project CARS 2 (PS5) — experimental | The gtelemetry command-line recorder on a computer wired to your router | Every page; 12 analysis cards (the game doesn't report traction control) |
| RaceBox GPS lap timer | Export a session from the RaceBox app as CSV and upload it | Summary, Video and 5 analysis cards: four based on your line, speed and grip, plus an estimate of where you accelerate and slow |
GT7 needs no setup in the game: as long as your phone or computer is on the same home network as the PS5, the recorder finds it and asks it for telemetry automatically. Full instructions are on the Recording tab.
Sign-up is by invitation. Go to app.trackandsim.com, choose Sign up, and enter:
@username, and it can't be changed later, so choose one you're happy to keep;Confirm your email. We email you a link to confirm your address. You can record and analyse laps straight away; friends, messages and sharing unlock once it's confirmed. Can't find it? Check your junk folder, or use Resend email on the bar at the top of the dashboard. The link works for 3 days.
Everything you record or upload is private to your account until you choose to share it with a friend.
Forgotten your password? On the sign-in screen, choose Forgot your password? and enter your email. The link we send works once, for an hour, and setting a new password signs you out everywhere else. It comes from noreply@trackandsim.com; if it doesn't arrive within a few minutes, check your junk or spam folder.
The header stays the same on every page:
| Control | What it does |
|---|---|
| Page tabs | HOME, DASH, SUMMARY, ANALYSIS and VIDEO. Only the pages that suit the active session are shown: a loaded session (GT7, Project CARS 2 or RaceBox) offers Summary, Analysis and Video, and switching between sessions keeps you on the same page; a live recording shows the Dash. |
| PS5 Status | CONNECTED agent while the gtelemetry recorder is streaming live to your account, otherwise IDLE, including while you review a recorded session. |
| ✉ Friends & messages | Opens the social panel: messages, friends and friend requests. A badge counts new requests and unread messages. See Racing your friends. |
| Your name (account menu) | Downloads… (the recorder app and command-line recorder), Devices… (pair and manage recorders) and Log out. |
| Settings | Theme, style and layout (below). |
| Help | This page. |
Loading, recording and switching sessions happen in the Sessions panel on the left. See Sessions & Library.
Click Settings in the header. Changes apply immediately and are saved to your account, so they follow you to any computer you sign in on.
| Setting | Choices |
|---|---|
| Theme | Eight palettes. Dark: Midnight (default), Graphite, Racing Green, Scarlet. Light: Paper, Ice, Sand, Mist. Charts, maps and traces recolour to match. |
| Style | Classic, or Metro: flat tiles, square corners and bold type. A live preview shows both. |
| Layout | For the Video page: Lanes Below (the two lap panels side by side, lap lanes underneath) or Lanes Right (panels stacked, lanes beside them; drag the divider to resize). |
The Android app and the command-line recorder each pair with your account once. After that they upload straight into your Library. You never type your password on the phone.
gtelemetry login and type the code.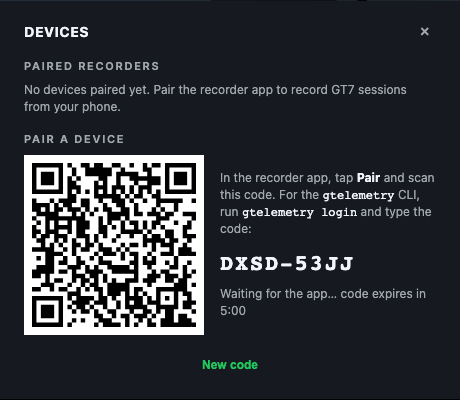
In Devices… you can Rename a device or Remove it. Removing one stops it uploading immediately, which is what to do if you lose a phone. Paired devices stay paired when you Log out of the browser; logging out only signs out your browsers. Resetting your password unpairs every device, so pair them again afterwards.
Pick the recorder that suits you. Both GT7 recorders talk to the PS5 over your home network, so the phone or computer must be on the same network as the PS5. Nothing needs setting up in GT7.
| GTelemetry Recorder (Android) | gtelemetry (Mac) | |
|---|---|---|
| Games | GT7 | GT7 and Project CARS 2 |
| How it works | Press Record, drive, press Stop. It uploads by itself. | Record to a file and upload, or stream live to the dashboard while you drive |
| Live view while driving | No: review after you stop | Yes: the Dash shows your telemetry as you drive |
| Get it | Account menu → Downloads… | Account menu → Downloads… (Apple-silicon Macs) |
Records GT7 from your phone and uploads each session to your Library when you stop. Needs Android 7 or later.
.apk file to the phone.)Updates: download the new version and install it straight over the top, without uninstalling first. Your pairing and recordings are kept.
Open the app, tap Scan QR code and scan the code from Devices… → Pair a device on the dashboard (see Pair a recorder). Check the app names app.trackandsim.com, give the phone a name, and tap Pair. No camera? Tap Type the code instead.
The Recordings tab lists anything still waiting to upload. A failed upload stays listed; use ⋮ → Retry upload. Uploaded recordings are removed from the phone unless you turn on Keep copies on this phone in Settings.
The first time you press Record, the app asks to run without battery restrictions. Allow it: without it, many phones (Samsung especially) pause the app a minute or two after the screen turns off, and the recording stops receiving. While recording, a Recording GT7 session notification shows; allow notifications so you can see it.
gtelemetry command-line recorderA small program you run in Terminal on a computer on the same network as your PS5. It can record to a file, upload files, or stream live to the dashboard while you drive. It's available for Macs with Apple silicon (M1 or later).
./gtelemetry login and enter the code from Devices… → Pair a device.The first time you record, macOS may ask whether gtelemetry can accept incoming network connections. Choose Allow: that's how the PS5's telemetry reaches it.
| Command | What it does |
|---|---|
gtelemetry stream | Streams live to your dashboard. Then press Record Session on the dashboard to record (see below). |
gtelemetry start | Records to a .gt7raw file in Documents/GTelemetry/Sessions. Works offline. Press Ctrl+C to stop. Restarting from a GT7 menu starts a new file, and files without a complete lap are deleted (--no-split and --keep-partial turn these off). |
gtelemetry upload --all | Uploads every recording in that folder to your Library (or name files individually). Files already uploaded, and GT7 files without a complete lap, are skipped. |
gtelemetry login | Pairs this computer with your account using a code from Devices…. |
gtelemetry logout | Unpairs the computer and forgets its sign-in. |
Add --source pcars2 to start or stream for Project CARS 2. gtelemetry --help lists every option. While running, a status line shows whether telemetry is arriving.
With gtelemetry stream running, the dashboard can record what it's streaming, and you can watch the Dash live while you drive.
gtelemetry stream next to your PS5. The PS5 Status pill reads CONNECTED agent once telemetry is flowing.Project CARS 2 broadcasts its telemetry to your whole network rather than to one device, so it needs switching on in the game and a wired computer to receive it.
gtelemetry stream --source pcars2 (live) or gtelemetry start --source pcars2 (to a file) on a computer connected to your router by Ethernet cable.A RaceBox is a GPS lap timer for real track days. GTelemetry reads its Track Session CSV export.
.csv.A RaceBox records position and speed but nothing from the car (no pedals, gears or RPM), so it gets the analysis cards based on your line, speed and grip, the Accel / Decel (estimated) card in place of Coasting, and the rendered driver's view without engine gauges. In place of a pedal trace, its lap traces show an A/D estimate of where you were accelerating and slowing, worked out from your speed. It is not pedal data.
Click Upload Session in the Sessions panel, or drag a file onto the page:
.gt7raw: a GT7 or Project CARS 2 recording made by the command-line recorder (or downloaded from your Library)..csv: a RaceBox Track Session export.The session loads in a few seconds and is added to your Library. Uploading the same file again just reopens the stored copy.
What each part of the dashboard shows and how to use it.
GTelemetry works in sessions: each recording, upload or comparison is one session. The Sessions panel on the left lists the ones you have open, and you can keep several open and switch between them. Your Library holds everything you've kept.
| Control | What it does |
|---|---|
| Upload Session | Open a .gt7raw or RaceBox .csv (see Uploading files). |
| Record Session / Stop Recording | Record what gtelemetry stream is sending (see Recording live). |
| Library | Open your stored sessions (below). |
Each session card shows a track-shape thumbnail, the track, car and in-game time of day, and badges:
Card actions: Select (or double-click) makes it the active session; Save keeps an unsaved one in your Library; Share sends it to a friend; Unload closes it (your Library copy stays). Drag cards to reorder them. The sessions you have open are remembered, so they reopen when you come back on any computer.
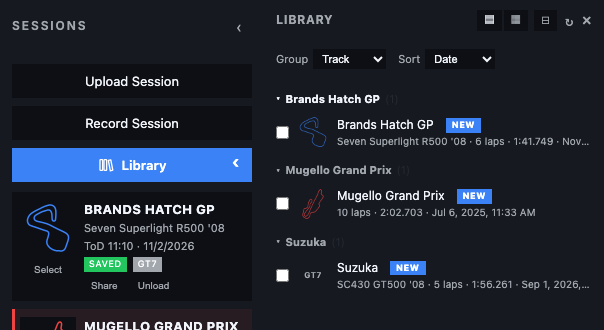
Everything you've stored is here, including sessions recorded on your phone or with the command-line recorder: they arrive in the Library without being opened. When new ones arrive, the Library button shows how many (for example 2 new), even while the dashboard is open, and they're tagged NEW the next time you open it.
Download gives you the exact original file (.gt7raw or .csv).
The live instrument panel, shown while you record with gtelemetry stream. Handy on a second screen beside your rig.
| Panel | Shows |
|---|---|
| Speed | mph (large) and km/h. |
| RPM | An arc gauge that fills towards the car's shift-light point; when it's nearly full, shift up. |
| Pedals | Throttle, brake and clutch, 0–100%: what you're asking for, not what traction control lets through. |
| Gear | The current gear (N for neutral). |
| Race Info | Lap (current/total in a race), Best, Last, Position (in a race), Water °C and Oil °C. |
| Lap Map | The track drawn from your car's position as you drive, with the car, the car name, and numbered corners (Corners On/Off toggles the labels). After a lap the track is identified and named in the header. |
Below the Dash and on the Video page are the lap traces (see Lap traces below).
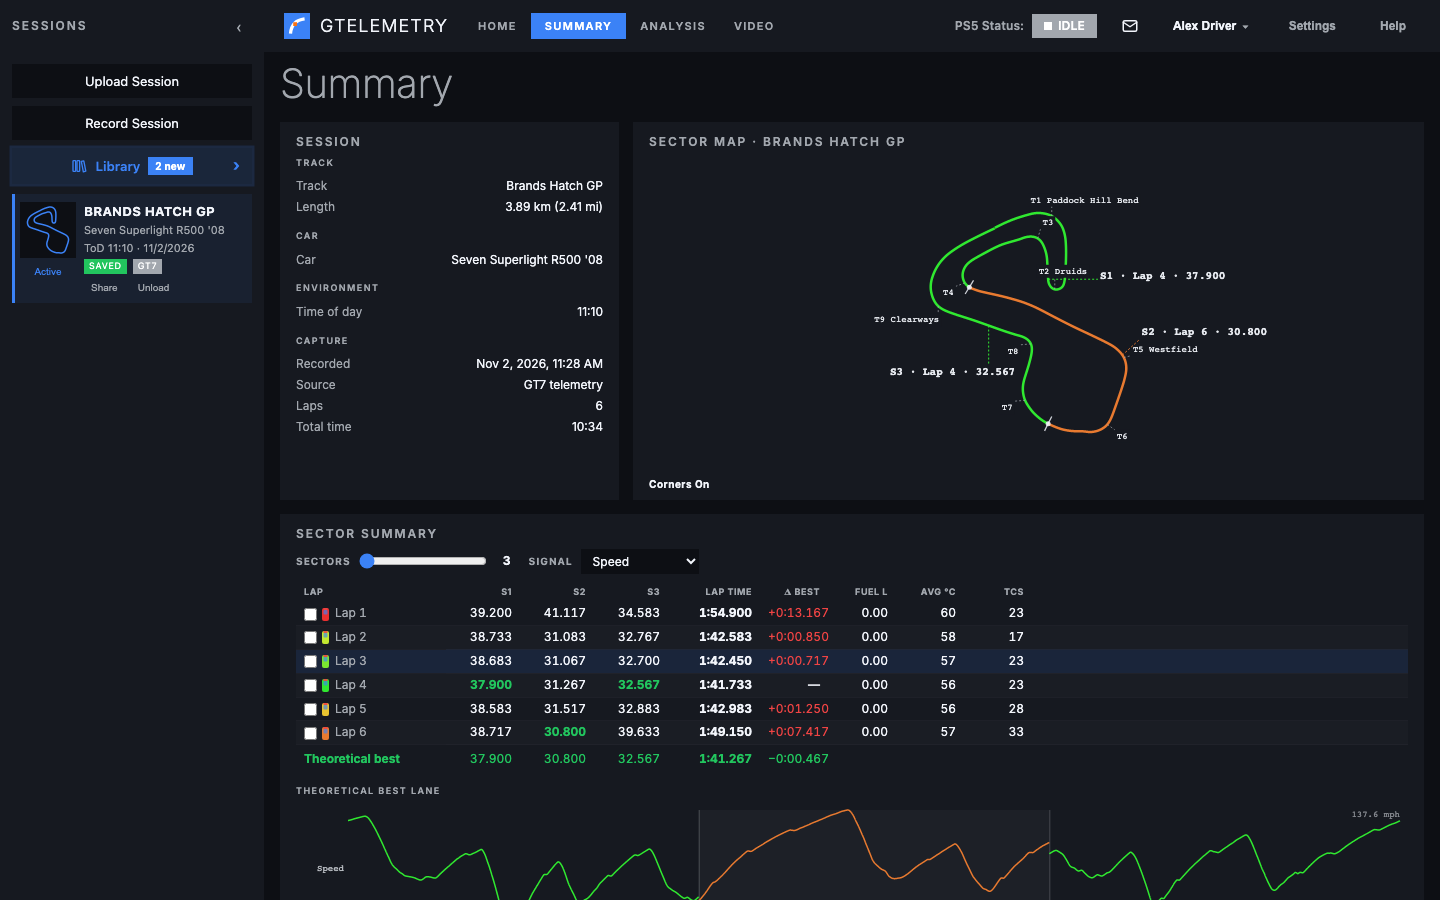
Every session opens here. Summary answers what was this session and where is the time?: the session's details, a sector-by-sector breakdown, your theoretical best, and a statistical comparison of two laps.
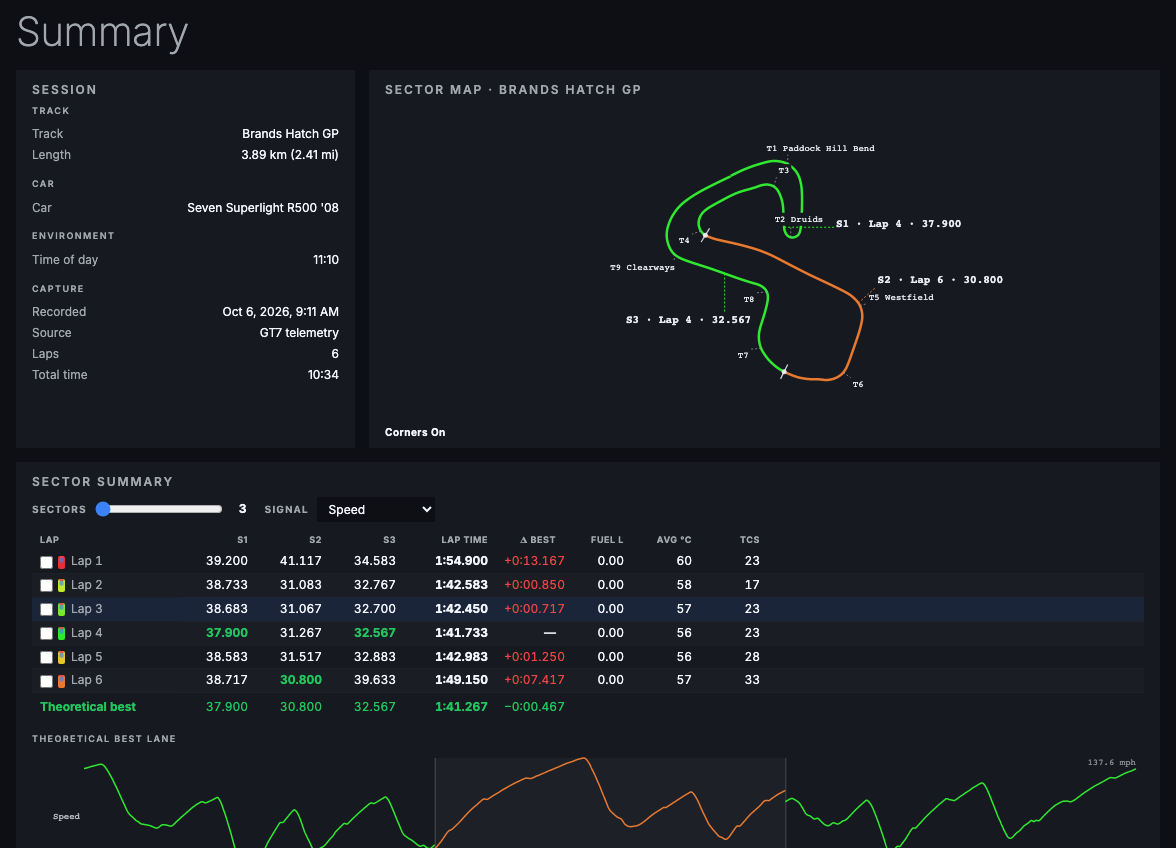
Summary, Analysis and Video all compare two laps: your Fastest lap, the benchmark, and your Pinned lap, the one you're working on. GTelemetry pins your second-fastest lap automatically when a session loads or a recording stops. Pin a different lap by clicking its row in the Sector Summary or its Pin button in the lap traces; once you choose, your choice sticks. Click Pinned on that lap again to go back to the automatic second-fastest lap.
The session's details, grouped as Track (name, RaceBox configuration, approximate length), Car, Environment (in-game time of day) and Capture (date recorded, source, laps, total time). Only details the session really has are shown. A comparison session also shows where its Fastest and Pinned laps came from.
The track drawn from your fastest lap's line, split into sectors. Each sector is coloured by the lap that was fastest through it and labelled with that lap and time (e.g. S2 · Lap 4 · 29.167). Numbered corners show where they are; Corners On/Off toggles their labels. Until you have two complete laps, it shows the plain line.
One row per lap, with each lap's sector times, lap time and gap to your best; for GT7 also fuel used, average tyre temperature and traction-control interventions. The fastest time in each sector is green, and each lap's icon is coloured from fastest (green) to slowest (red). Click a row to pin that lap; tick its checkbox to add it to a comparison.
Pick a Signal and compare Fastest against Pinned in three ways: a table of statistics with the difference worked out, a distribution (how much of each lap was spent at each level), and a box-and-whisker plot. Signals: Speed, Throttle, Brake, RPM, Gear, Lateral / Longitudinal / Combined G, Line offset, and the TCS and ASM assists. RaceBox offers Speed, the G signals and Line offset.
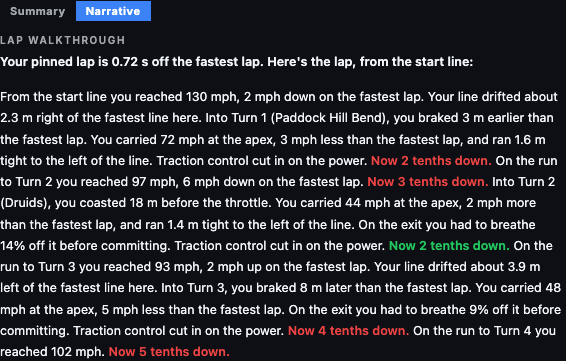
Your coaching workspace. Each card measures one part of your driving, a map shows where it happens, and a coaching panel explains it in plain language, all comparing your Fastest and Pinned laps.
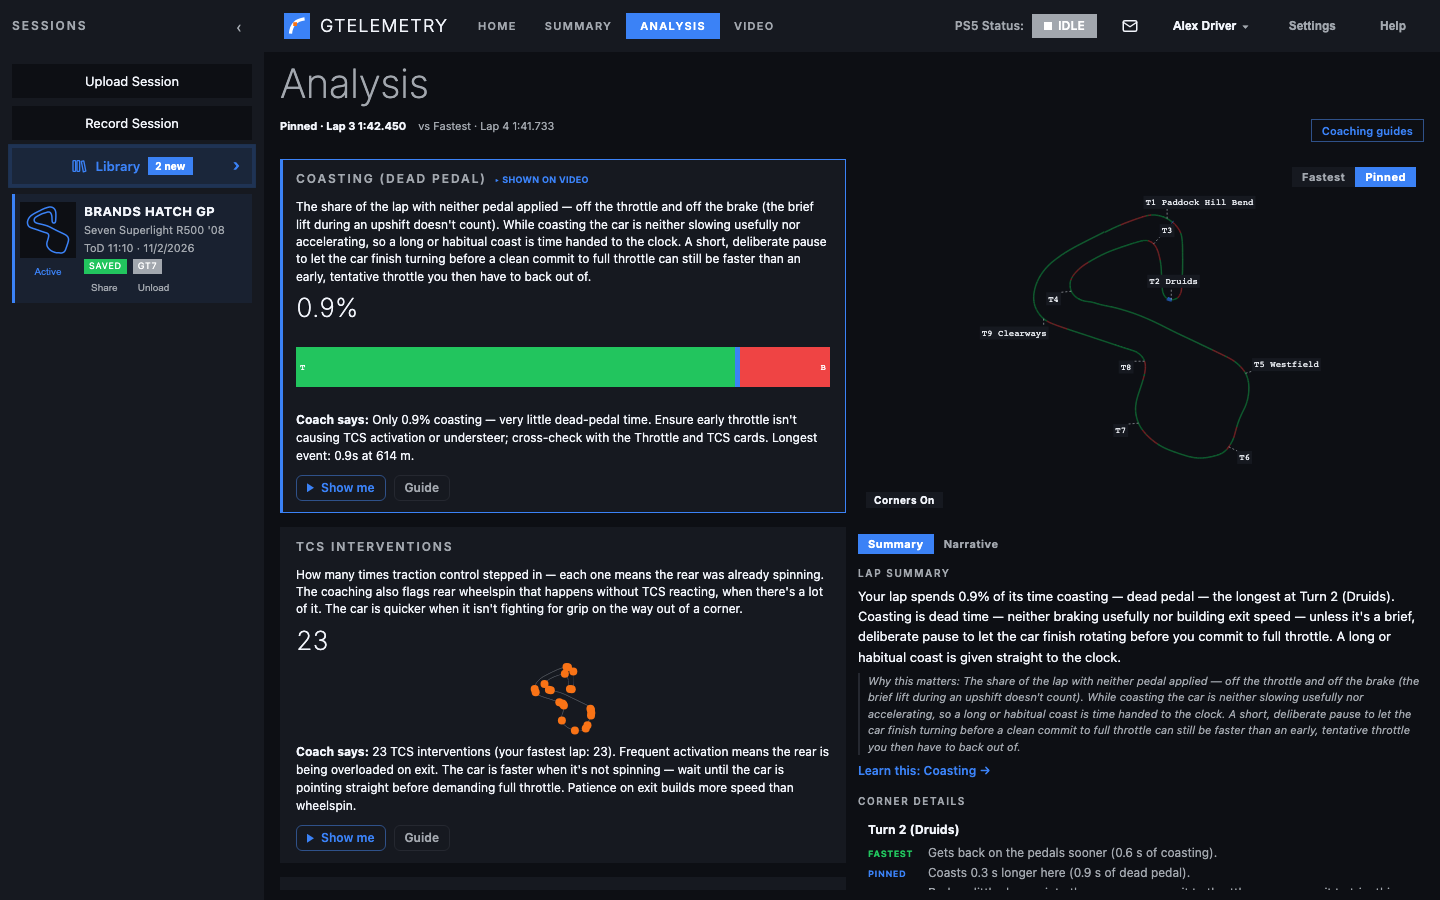
The coaching is worked out from your telemetry on your computer; it says plainly when two laps are similar. With nothing pinned, cards show your fastest lap on its own. You need at least one complete lap.
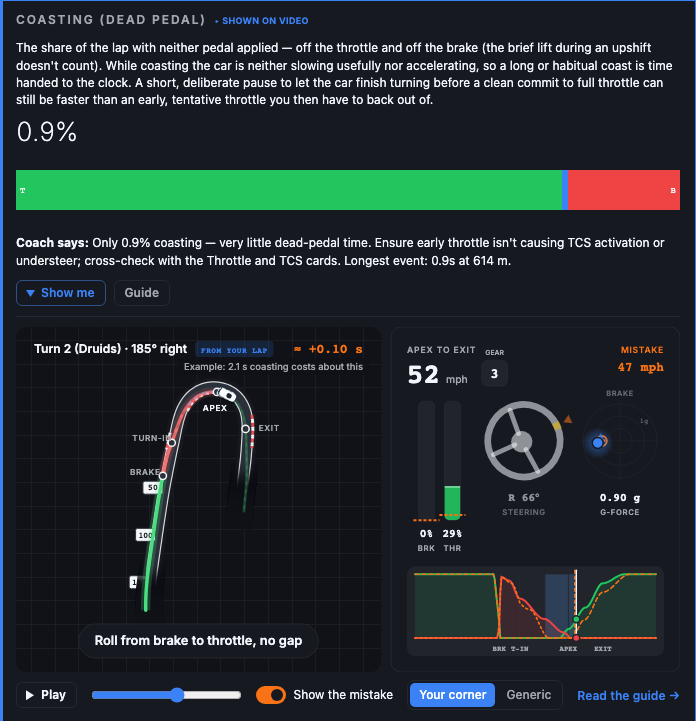
Every card has a ▶ Show me button under its advice. It opens an animation of the technique the card is about, played on the corner that card flagged on your lap: the longest coast for Coasting, the sharpest brake release for Brake Release, and so on. Only one animation plays at a time.
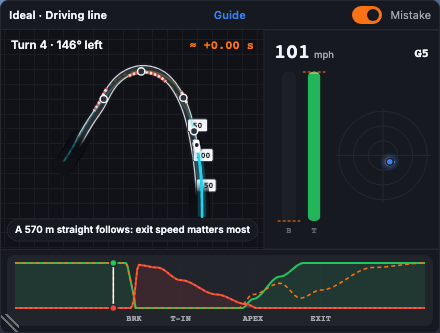
The best line through a corner depends on what follows it.
The Driving Line and Min Corner Speed coaching says so when it applies, and their Show me animations switch to the matching line. For every corner type, elevation and camber, read the Corners, elevation and exit priority guide.
Which cards you see depends on what the source records: GT7 all 13; Project CARS 2 12 (no TCS); RaceBox 5: Accel / Decel (estimated) in place of Coasting, then Min Corner Speed, Traction, Steering Smoothness and Driving Line. Each card below is tagged with the sources it works for.
The cards tell you what happened on your lap; the coaching guides teach you how to fix it. There is a guide for each card (the RaceBox Accel / Decel card shares Coasting's), plus six Foundations chapters that underpin them all. Each one is written for real track days and for sim racing, and layered Fundamentals, Intermediate and Advanced so you can stop at your level.
Foundations: Vision and the vanishing point · Corners, elevation and exit priority · Grip, weight transfer and the traction circle · Surfaces, weather and tyres · Setup by car class and drivetrain · Racecraft, safety, flags and penalties · All guides
The share of the lap with neither pedal applied (throttle and brake both under 5%). Every moment here the car is neither slowing usefully nor accelerating. The brief lift during an upshift doesn't count.
A bar split into throttle, coast and brake time. The coaching names your longest coast and where it happens: the best place to start.
| Coasting | Meaning | What to do |
|---|---|---|
| under 2% | Very little | Fine, but check TCS and Throttle Application: getting on the power too early can explain it. |
| 2–8% | Good pedal discipline | Gains now come from where you switch pedals, not removing coasting. |
| 8–15% | Moderate | Work through the longest coasts first. |
| over 15% | A lot | Your biggest quick win: brake deeper into the corner or get back on the throttle sooner. |
The brake blends straight into the throttle around the apex, with a brief overlap and no gap. The mistake releases the brake early and coasts; the dead time is shaded blue.
Coaching guide: Coasting (Dead Pedal) → technique, line, cars, surfaces, weather, racecraft and drills for this card
A RaceBox can't see your pedals, so this card takes Coasting's place for RaceBox sessions. It uses the A/D estimate, worked out from how quickly your GPS speed changes, not measured pedal data. For each corner it finds where you appear to start slowing and where you're back on the power. Every metre between the two is a metre not spent accelerating.
A bar split into accelerating, coasting and slowing time (A, C, D). With a pinned lap, the number is the average change in each corner's slow-to-power gap compared with your fastest lap (+ is a longer gap). On the lanes, each corner is drawn |——| from where slowing starts to where the power comes back. The line is red where that gap is at least 10 m longer than on your fastest lap, green where it's at least 10 m shorter, and grey in between (within the estimate's error). A thicker line is a bigger difference, labelled in metres. Your fastest lap's row is always thin grey: it's the reference. On the map, a red dot marks where slowing starts and a green dot where the power comes back, ringed where the gap differs from your fastest lap by 10 m or more.
| Gap vs fastest | Meaning | What to do |
|---|---|---|
| within ±10 m | Within the estimate's error | Nothing to chase here. Look at the other cards. |
| 10–25 m longer | Slowing earlier or back on the power later at some corners | Start with the corner the coaching lists first: brake a touch later or pick up the power sooner. |
| over 25 m longer | A lot of time not accelerating | Your biggest gain on a RaceBox lap. Compare your brake marker and exit with the fastest lap there. |
Only differences of 10 m or more are called out, because the estimated points are accurate to a few metres.
The same ideal brake-to-throttle blend as Coasting, played as the ideal (it isn't your lap): the brake blends straight into the throttle around the apex, with no gap.
Coaching guide: Coasting (Dead Pedal) → the same brake-to-throttle technique this card points at
How many times traction control stepped in. The coaching also flags rear wheelspin that happened without TCS reacting, when there's a lot of it.
The track outline with an orange dot where each intervention started, so you can see which exits overload the rear.
| Interventions | Meaning | What to do |
|---|---|---|
| 0 | Clean | Excellent throttle control. |
| 1–3 | Manageable | At those corners, feed the throttle in 10–15 m later or more gradually. |
| over 3 | Frequent | You're overloading the rear on exit. Wait until the car is pointing straight before full throttle. |
The throttle is fed in as the steering unwinds, and the TCS light stays off. The mistake stabs the throttle with lock still on, so TCS fires; where it fires is shown orange.
Coaching guide: TCS Interventions → technique, line, cars, surfaces, weather, racecraft and drills for this card
At each corner, how far past the apex (the slowest point) you travel before the throttle reaches 20%, and how that compares with your fastest lap at the same corner.
A bar per corner: red where you were later than the fastest lap, blue where you were earlier, with the fastest lap's average as a dashed line.
| Average vs fastest | Meaning | What to do |
|---|---|---|
| over 5 m later | Late on the power | Commit as soon as the car is pointing straight: exit speed carries all the way down the straight. |
| within 5 m | On pace | Look elsewhere for time. |
| over 5 m earlier | Earlier than your best | Check it isn't causing understeer or TCS; if the car runs wide, early throttle costs time. |
The throttle comes in at the apex and builds as the wheel unwinds. The mistake waits well past the apex.
Coaching guide: Throttle Application → technique, line, cars, surfaces, weather, racecraft and drills for this card
Once you're back on the throttle, how far you travel to reach 50% and then 90%.
A row per corner: a green tick at 50% and a blue tick at 90%. Ticks on the left mean a quick, committed squeeze. A quick 50% followed by a slow 90% is hesitation that costs exit speed.
| Average to 90% | Meaning | What to do |
|---|---|---|
| over 40 m | Very gradual | Aim for 50% within 10 m of picking up, then full over the next 30 m. |
| 20–40 m | Progressive | Good. Target 50% within 10 m and 90% within 35 m. |
| under 20 m | Very quick | Check TCS: a fast squeeze can cause wheelspin. |
One decisive squeeze to full throttle. The mistake ramps up slowly and timidly.
Coaching guide: Throttle Ramp Rate → technique, line, cars, surfaces, weather, racecraft and drills for this card
The "squeeze, breathe, squeeze": corners where you got on the throttle, then lifted again (by 8% or more, after reaching at least 30%) before going flat out. The card counts how many corners show it.
Your throttle trace for the lap, with each corner exit where you lifted shaded red.
What matters is when you reach full throttle, not when you first touch it. A tentative pickup you have to back out of is slower than a slightly later, clean one. Pause briefly to let the car rotate, then commit in one squeeze.
| Pattern | Meaning | What to do |
|---|---|---|
| No lifts | Clean commitment | Keep picking up only once the car will take it. |
| One or two corners | Occasional early pickup | At those corners, pause after the brake, then commit in one go. |
| Many corners | A habit | You're on the power before the car has turned. Delay slightly and commit cleanly. |
Waits for the car to finish turning, then commits in one clean squeeze. The mistake picks up early, lifts, then squeezes again.
Coaching guide: Throttle Commitment → technique, line, cars, surfaces, weather, racecraft and drills for this card
The average peak brake pressure across your braking zones (a zone runs from the brake passing 5% until it drops back below).
Your brake pressure around the lap with each zone shaded. Sharp spikes are jabs; broad humps are progressive braking. The coaching compares the number and strength of zones with your fastest lap.
| Average peak | Meaning | What to do |
|---|---|---|
| under 60% | Under-braking | Brake harder and sooner in the zone: reach peak within the first 5–10 m. |
| 60–79% | Moderate | Find the zones with low peaks and work on those. |
| 80% or more | Confident | Pressure is there. Look at Brake Release next. |
Brakes at the board and reaches peak pressure almost at once. The mistake brakes early and gently.
Coaching guide: Braking Zones → technique, line, cars, surfaces, weather, racecraft and drills for this card
How quickly you come off the brake after peak pressure, in percentage points per metre. This is trail braking: easing off gradually as you turn in keeps weight on the front tyres.
A bar per braking zone: red released too sharply, green progressive, yellow very gradual.
| Release rate | Meaning | What to do |
|---|---|---|
| over 3 %/m | Too sharp | The front unloads just as you turn in. Ease off over the last 30–50 m towards the apex. |
| 1–3 %/m | Progressive | Good. Refine the last 20% of pressure at turn-in. |
| under 1 %/m | Very gradual | Make sure you're fully off the brake by the apex, or it scrubs exit speed. |
Trails the brake off as the steering goes in, reaching zero at the apex, so the G-dot rolls round the edge of the circle. The mistake drops the brake all at once at the turn-in.
Coaching guide: Brake Release Profile → technique, line, cars, surfaces, weather, racecraft and drills for this card
How much of each braking zone's work happens in its first third. Fast drivers hit the brake hard early, then bleed it off. The road-car habit is the opposite: softest first, hardest at the end.
Your brake trace with each zone shaded green (front-loaded), yellow, or red (back-loaded), and a line marking the first third.
| In the first third | Meaning | What to do |
|---|---|---|
| 55% or more | Decisive | Keep hitting peak early. Try braking a touch later. |
| 40–55% | Middle-loaded | Hit peak harder and earlier: it shortens the stop. |
| under 40% | Back-loaded | Commit to firm pressure in the first few metres. You can often brake later once you do. |
A front-loaded stop that tapers off. The mistake builds up street-style, hardest at the end.
Coaching guide: Brake Pressure Shape → technique, line, cars, surfaces, weather, racecraft and drills for this card
Your slowest speed in each corner, compared with your fastest lap at the same corner. The coaching also notes where in the corner the slowest point falls: reaching it earlier lets you unwind the wheel and get on the power sooner.
A bar per corner: green faster than your fastest lap, red slower, grey when there's nothing to compare.
| Average vs fastest | Meaning | What to do |
|---|---|---|
| over 1 mph slower | Losing speed mid-corner | Trail braking and a later, more patient apex carry more speed through. |
| within 1 mph | Matching | Work on consistency across all corners. |
| over 1 mph faster | Strong commitment | Make sure the exit follows: corner speed only helps if you keep it. |
Brakes only as much as the corner needs and carries speed through the middle; the line is coloured by speed. The mistake over-slows the entry. Before a long straight it plays an exit-first version (see Exit priority).
Coaching guide: Min Corner Speed → technique, line, cars, surfaces, weather, racecraft and drills for this card
How consistently you use the grip available: your average combined cornering-and-braking/accelerating force as a share of the peak you reach. 100% would mean always at your own limit. The coaching also reports how much of your loaded time is combined loading (turning while braking or accelerating), compared with your fastest lap.
A scatter of sideways G (left–right) against braking/accelerating G (up–down) for the whole lap; the last few seconds are highlighted.
| Utilization | Meaning |
|---|---|
| under 35% | Lots of grip unused |
| 35–49% | Reaching the limit, but not holding it |
| 50% or more | Consistently working the grip |
Braking blends into turning and turning into throttle, so the G-dot follows the edge of the circle; the trace shows how much grip is in use. The mistake does one thing at a time, and the dot cuts across the middle.
Coaching guide: Traction Circle Utilization → technique, line, cars, surfaces, weather, racecraft and drills for this card
Rev-limiter hits, missed downshifts (corners you reached still in a higher gear than the downshift GT7 suggested on the approach) and your average RPM.
RPM around the lap, with the car's shift-light range shaded green where GT7 provides it and red ticks where you hit the limiter. On the Video page this card colours the lap by gear, from light purple (1st) to dark purple (8th), with a badge at each missed downshift.
| Result | What to do |
|---|---|
| Limiter hits | Shift up earlier, at 95–98% of peak RPM: the limiter cuts power just when you want it. |
| Missed downshifts | Take the suggested downshift before turning in, to keep the engine in its strongest range. |
| Clean | Gear choice is solid. |
Project CARS 2 doesn't report the rev limiter or a suggested gear, so for its sessions this card shows RPM only.
Downshifts through the braking zone (purple marks on the corner) so the engine pulls from the apex; a rev strip shows the RPM. The mistake arrives a gear too high. It plays on a corner that needs a downshift, and the gear numbers come from a generic gearbox.
Coaching guide: Gear & RPM → technique, line, cars, surfaces, weather, racecraft and drills for this card
How economical your steering is through each corner: the total turning your car's path does, compared with the minimum (one clean arc). 1.0× is a single smooth arc; higher means corrections or sawing at the wheel. It's worked out from your line, so it works for RaceBox too.
A bar per corner, green (economical) through yellow to red (lots of extra input).
| Ratio | Meaning | What to do |
|---|---|---|
| up to 1.15× | One clean arc | Keep the wheel quiet; look to carry more speed. |
| 1.15–1.4× | Some extra input | One progressive turn-in, one arc through the corner. |
| over 1.4× | Sawing / correcting | Slow your hands at turn-in and stop chasing the line mid-corner. |
One smooth turn-in, a steady wheel through the middle and a smooth unwind; the trace shows the steering. The mistake saws at the wheel.
Coaching guide: Steering Smoothness → technique, line, cars, surfaces, weather, racecraft and drills for this card
How far your line is from your fastest lap's line, all the way round, in metres: the average and the largest gap.
A trace around zero (the fastest line). It dips (red) where you're to the right of the fastest line and rises (blue) where you're to the left. On the map your path is tinted the same way, over a faint fastest line.
Outside on entry, a late turn-in, the apex, then out to the exit kerb. The mistake turns in and apexes early and runs out of road. Before a long straight it plays an exit-first line; before a corner close behind, it finishes on the side the next corner turns in from (see Exit priority).
Coaching guide: Driving Line → technique, line, cars, surfaces, weather, racecraft and drills for this card
Across the bottom of the Dash and Video pages, one block per completed lap, plotted against distance round the lap. Each lap shows the lanes its data supports: GT7 and Project CARS 2 laps show T/B, MPH, RPM, GR and G; RaceBox laps show A/D, MPH and G.
| Lane | Shows |
|---|---|
| T/B | Throttle (green) and brake (red), 0–100% |
| A/D | RaceBox: estimated accelerating (green) and slowing (red), in place of T/B. Not pedal data |
| MPH | Speed, 0–200 mph |
| RPM | Engine speed, 0–9,000 |
| GR | Gear |
| G | Lateral (yellow) and longitudinal (purple) G |
A collapsed block shows only its top lane; hover to read every lane's value at the cursor. Blocks are ordered fastest first, with your Pinned lap second, and a session keeps up to 50 laps. Each lap header shows the lap time and its gap to your best. Expand/Collapse shows or hides the lap, Pin makes it your Pinned lap, Del removes it from the open session, and the checkbox selects it for a comparison. Move the mouse over the traces, or drag a finger across them on a phone or tablet, and a cursor lines up every lap at the same point on track. Drag up or down to scroll the laps.
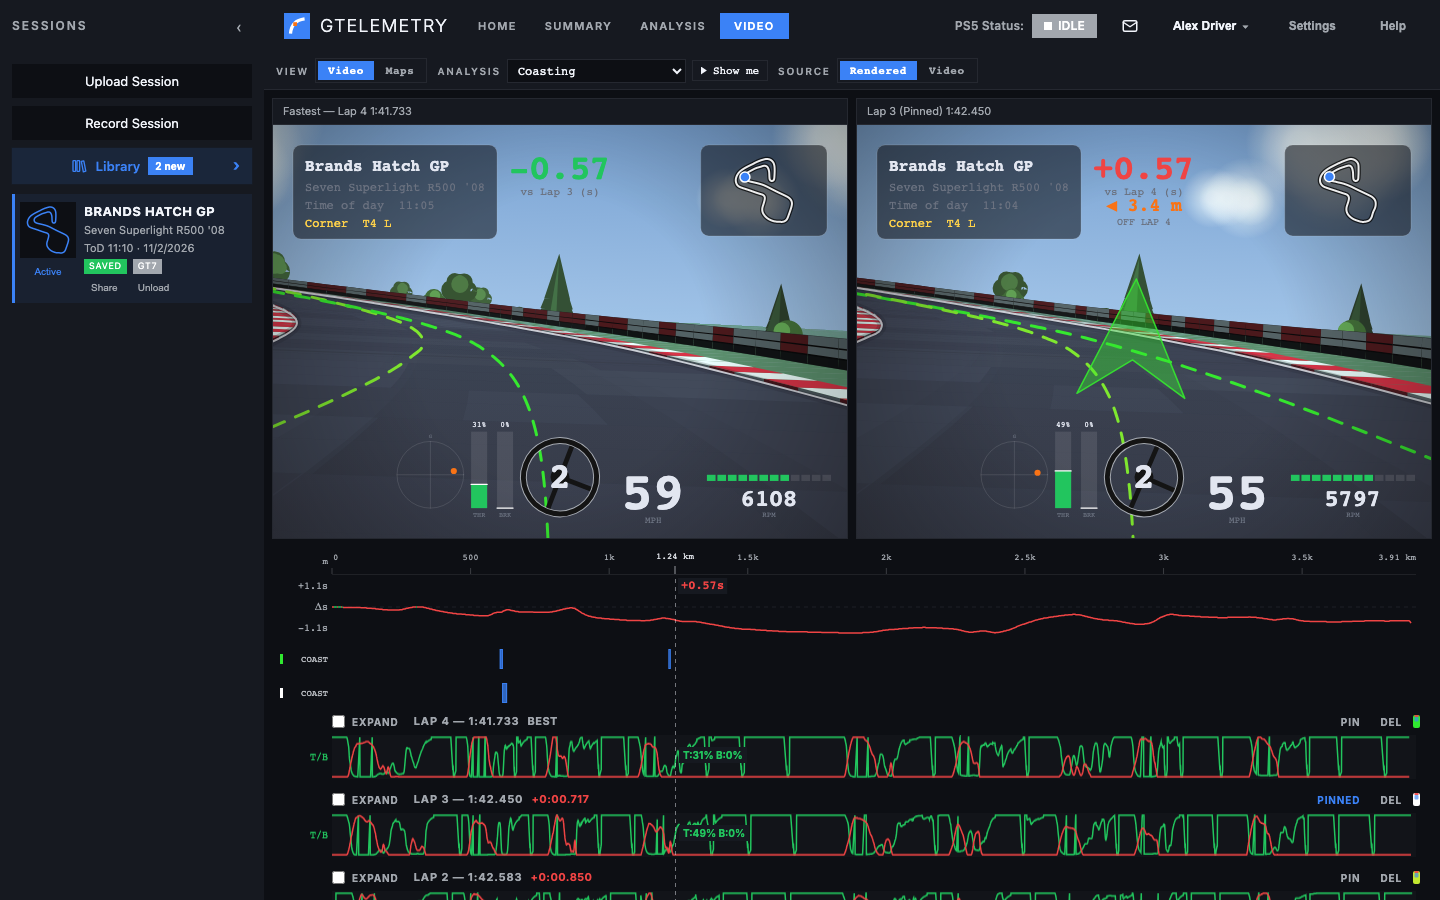
For every session, GT7, Project CARS 2 or RaceBox: see the difference between your Fastest (left) and Pinned (right) laps side by side, scrubbed together by distance as you move along the lap traces. The driver's view is a good place to practise where you look: see the Vision and the vanishing point guide.
| Control | What it does |
|---|---|
| VIEW: Video / Maps | Video shows the two driver's views; Maps swaps them for two top-down lap maps, coloured for the selected analysis (coasting stretches, braking zones, a grip heat map…), with numbered corners. |
| ANALYSIS | Which card's findings to show. It's the same selection as on the Analysis page, so whatever you pick there appears here. |
| ▶ Show me | Opens an animation of the ideal technique for the selected analysis over the left panel, played on the corner nearest the cursor as you move along the lap. Mistake adds a car making the common error. Drag its bottom-left corner to resize it; your size is remembered. See Show me. |
| SOURCE: Rendered / Video | Rendered draws a driver's-eye view of each lap from the telemetry, with a HUD (speed, gear, pedals, G-meter), corner names and trackside scenery. No video needed. Video plays your own gameplay recording (below). |
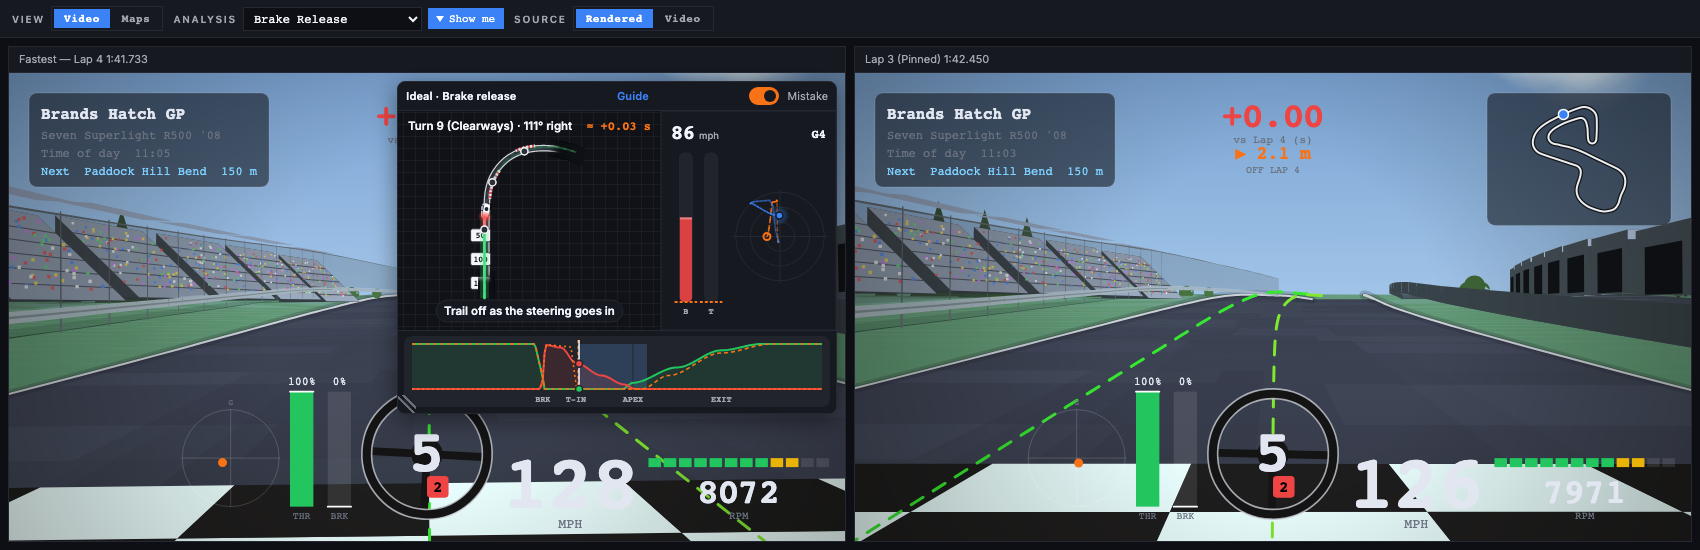
Above the lap traces, the analysis lane marks where the selected card's findings happen around the lap, in the card's own colours: coasting stretches, TCS interventions, braking zones, the throttle ramp, apex speeds as ticks, a grip heat-strip for Traction, the lap coloured by gear for Gear & RPM, and so on. Hover any marking and both panels jump to that spot. That's the quickest way to see what you were doing where the analysis says you lost time. The Lap Delta lane shows the time gap building up between the two laps.
Below the lanes are the lap traces.
The rendered view draws each track as it's driven: tarmac circuits get kerbs, barriers and braking boards. GT7's dirt rally stages (Colorado Springs Lake, Fisherman's Ranch, Sardegna Windmills) get a narrow dirt road with marker poles and bales; Lake Louise is drawn as snow with ploughed banks; Barcelona-Catalunya Rallycross is drawn as dirt. A track that hasn't been identified is drawn as tarmac.
A RaceBox session uses the same Summary, Analysis and Video pages as a game session, so switching between your real and sim laps keeps you on the same page. What's different comes from what a RaceBox records: position and speed, but nothing from the car.
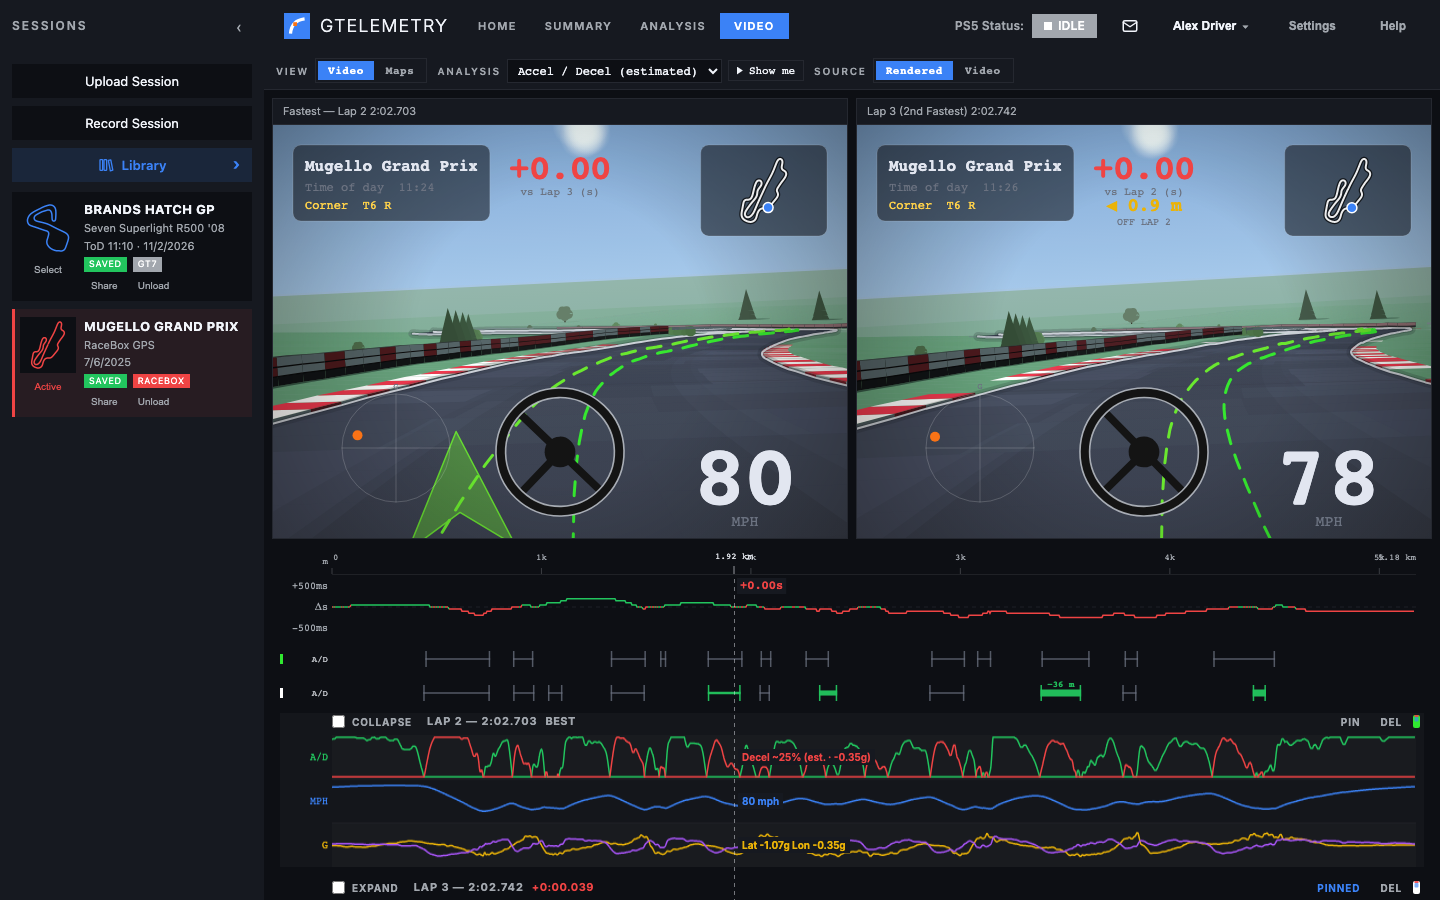
Lap and sector times come from the RaceBox, and lap names match its file; only complete laps are shown. G-forces are worked out from your speed and line, which is more reliable than the device's own sensors here. Altitude is evened out across laps so the lines overlay properly.
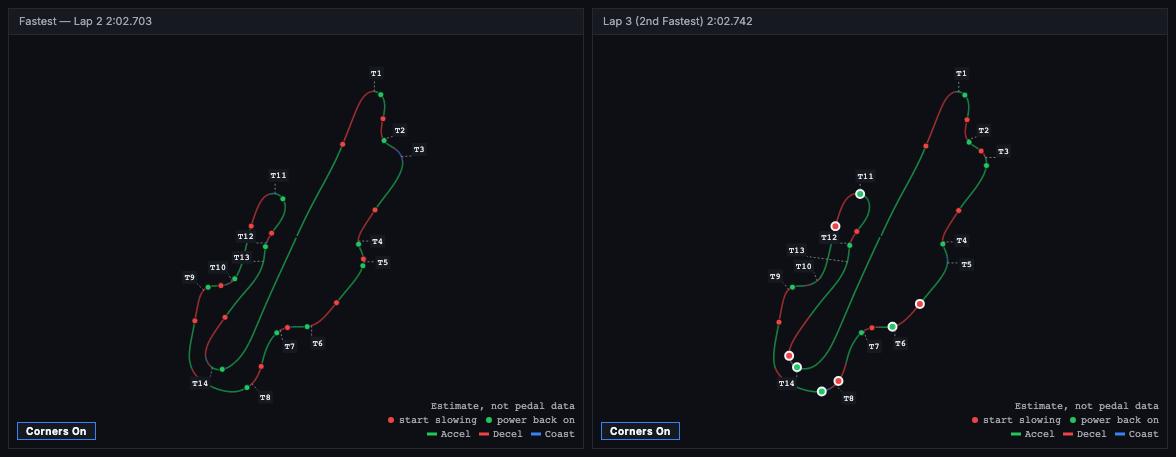
A RaceBox can't see your pedals. The A/D lane is an estimate, drawn like the GT7 throttle/brake lane: green where the car is gaining speed, red where it is losing speed, and neither where it is coasting. It comes from how quickly your speed changes (longitudinal G). The "est." in its readout is there to remind you it is not a measured pedal.
How close is it? We checked it against real pedal data from Gran Turismo 7 laps, working from speed and position only, as a RaceBox would. In testing over a wide variety of cars and tracks we see about 87% agreement with the real pedals (accelerating, braking or coasting), with 94% of braking zones found. Where a braking zone is found, it typically starts within a few metres of the real brake point. It is least reliable off-road or on loose surfaces, where the car can lose speed with the throttle on.
What it can't show:
Use it to compare laps (where you started slowing, how early you were back on the power), not as an exact pedal trace. The Accel / Decel (estimated) analysis card does that comparison for you, corner by corner, and colours the maps when it's selected.
How to get the most out of GTelemetry: turning a session into lap time, building comparisons, and racing your friends.
The cards are listed in the order worth working through, grouped by pedal: throttle cards first, then brakes, then the results of both.
A comparison session puts laps from different sessions together, such as your best lap from each of three evenings, or your lap against a friend's. It works like any other session: Summary, Analysis and Video (or RaceBox) all compare its fastest and pinned laps.
Add friends, chat, and share sessions to compare against each other's laps.
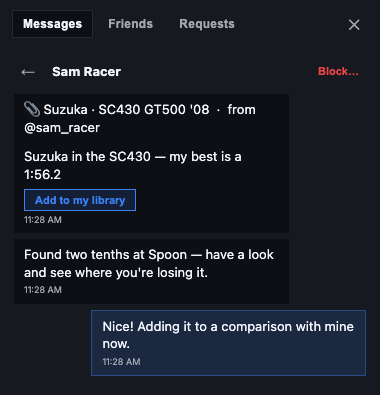
Click ✉ in the header → Friends, type their @username and click Add. They'll see your request under Requests and can Accept or Decline. There's no directory to browse: you need their exact username.
Under Friends, click Message. Conversations appear under Messages, with a badge for unread ones. If you unfriend someone, your conversation becomes read-only.
A shared session is a read-only copy: your friend can open it and analyse it, but not download, edit or re-share it. Comparisons can be shared too.
Click Block… on their request, on their row under Friends, or at the top of your conversation with them.
The rendered view needs no setup and is great for line and inputs. To see what really happened (traffic, a twitchy rear, a missed apex), record gameplay on the PS5 at the same time as your telemetry, then follow Using your own gameplay video. Sync once per video; the sync is remembered.
Before the day, read Racecraft, safety, flags and penalties (flags, passing etiquette, what to do in a spin) and Vision and the vanishing point. If rain is forecast, read Surfaces, weather and tyres.
| Problem | Try this |
|---|---|
| The app stays on Looking for your PS5… | Make sure GT7 is running and the phone and PS5 are on the same Wi-Fi (not a guest network). On iPhone, Local Network access must be allowed (Settings → Privacy & Security → Local Network). Or type the PS5's IP address in the app. |
| Recording stops when the phone's screen turns off | Allow unrestricted battery use (the app asks on Record; also under Settings → Battery). On Android 14 or newer, keep Keep screen on while recording switched on. |
| "No complete lap — recording discarded" | The recording didn't include a full lap: a lap counts once you've crossed the start/finish line twice while recording. Press Record before you start your out-lap or flying lap, and Stop after crossing the line at the end. |
| Rings turn orange mid-session | No data for a few seconds: you're in a menu or loading screen, the PS5 is off, or the phone has dropped off Wi-Fi. Telemetry only flows while you're on track. |
| "No active gtelemetry stream" when clicking Record Session | Run gtelemetry stream on the computer next to your PS5 first, and check it's paired (gtelemetry login). |
gtelemetry shows no telemetry | Same network as the PS5? GT7 on track? Did you allow incoming connections when macOS asked? (System Settings → Network → Firewall → allow gtelemetry.) |
macOS says gtelemetry can't be opened | Download the latest zip from Downloads…: it's notarized by Apple and opens normally. (An older copy can be opened with xattr -d com.apple.quarantine gtelemetry in its folder.) |
| Project CARS 2 shows a low packet share | Use a computer connected by Ethernet. Over Wi-Fi only about 12% of packets arrive. |
| Problem | Try this |
|---|---|
| "That code didn't work" | Codes last 5 minutes and work once. Click New code in Devices… and try again. |
| The app went back to the Pair screen | The phone was removed under Devices…. Pair it again; recordings waiting to upload are kept. |
| An upload failed | Recordings tab → ⋮ → Retry upload once you have internet. Very long sessions (over about 2 hours) can be too large. |
| Lost phone or computer | Remove it under Devices…: it can't upload any more. |
| Question | Answer |
|---|---|
| Why does it say "Unknown Track"? | The track couldn't be matched to GTelemetry's track list (new or unusual layouts). Everything works except the track name and corner names, and the rendered view draws it as tarmac. |
| Why is Analysis empty? | It needs at least one complete lap. Out-laps and in-laps don't count. |
| Is the time in Show me what I lost? | No. It's marked ≈ because it's an example: what a typical version of that mistake would roughly cost on that corner. The card and the coaching show your real numbers. |
| Why does Show me pick that corner? | It uses the corner the card flags most strongly that suits the animation: the pedal cards need a corner you brake for, and Gear & RPM one that needs a downshift. On the Video page it follows the cursor. Choose Generic to see a standard corner instead. |
| Why are some cards or statistics missing? | They need data the source doesn't record: TCS for Project CARS 2; pedals, gears and RPM for RaceBox. |
| The comparison looks odd | Check which lap is pinned: compare your fastest with a representative lap, not one with a spin or an off. |
| Can I change my username? | No: usernames are permanent. Your display name can differ from it. |
“Gran Turismo”, “PlayStation” and “PS5” are registered trademarks or trademarks of Sony Interactive Entertainment Inc. Project CARS is a trademark of its respective owner. RaceBox is a trademark of its respective owner. GTelemetry is not affiliated with, endorsed by or sponsored by Sony Interactive Entertainment Inc., Polyphony Digital Inc. or any other owner named here.